Showing posts with label Creative Ambitions. Show all posts

Saturday, December 16, 2017

Christmas Mantel 2017

I finally got the tree up and the mantel decorated!

I kept my cabin theme from this year’s Fall’s Cozy Cabin Mantel

and went right into decorating the cabin for a wintery mountain scene!

This is my Cabin In The Woods Christmas Mantel 2017…

Christmas Mantel 2017 a

I love the greenery with this mantel

and how it really does make it look like a cabin in the woods!

Christmas Mantel 2017 5

One of my fav things is the antique stoneware crock!

christmas Mantel 2017 e

And to go with my woodsy theme…

my tree has rustic, plaid, and cabin-y type ornaments on it!

Christmas Mantel 2017

I also used the old trusty outdoor tub for my tree base. 

WELL…

it definitely feels like a Tender Tennessee, Woodsy, Rustic, Mountainy Christmas around here!!

Thanks for stopping by to check out my Christmas Mantel this year!!

Christmas Mantel 2017 c

I wish everyone

a VERY MERRY and BLESSED CHRISTMAS this year!

Friday, July 11, 2014

Some Paintings I’ve Been Working On


Hi again everyone!  Two posts in one week… that’s a wow for me!

I just wanted to share with you some paintings I’ve been working on in the midst of our backyard makeover.

I try to get some creative time in when it’s raining or too hot outside to work.

I LOVE painting and creating… so here you go…

Girl Playing Guitar

So enjoyed painting this gal and her guitar!

Folk Flower Painting

And… I always have to throw some Folk Flower Paintings in the mix!

Folk Flower Crate Art

This one is painted on one of those Shipping Crate Table Panels I’ve been holding on to for awhile now.

And last… but not least…

Cow Wing Back Chair Painting

This painting (it’s a biggy) actually started out as something else… but after some frustration with it… I wiped the slate clean and painted this…

it is one of my FAVS this summer and I may do a series of them!

As you can tell… I’ve been in a colorful mood with my art here lately… and loving it!

KJoyner Art

I am always thinking about selling my paintings again… I’m in the process of trying to figure out where and when.

Thanks for stopping by… hope you enjoyed! 


Thursday, March 7, 2013

Just Being Creative


Here’s a little update of what I’ve been doing…

Creating!

YEP!  I have been so inspired… so motivated… so excited to just… Create!

(image: Graphics Fairy)

Let’s see…

I have been creating mixed media art (that includes rusting metal… so fun), thrifting (just had to throw that in), creating a journal,  and sewing

sewing

YES… sewing! 

Rather… trying to learn how to sew!

****I’m also in the process of creating my spring mantel and working on a very creative project with a very sentimental birdhouse (this one may take awhile… if I can even do it!)****

And as this creative force hit me @ a week ago or so… the Lord led me to share this journey with my creative friend Kolein

She is now my creative sounding board accountability partner… and I hope I’m a good one for her!

AND then

and then, and then…

the Lord led us to this…

Jeanne Oliver e-courses!

WOW!

These classes have so enriched both of our lives…and we’ve only just started!  We so needed these… didn’t we Kol??

((Jeanne Oliver Designs.com/blog))

OK….

Last time I shared with you my first e-vuh mixed media art project

WELLLLLLLLL…

I went back and changed the coloring on it…brightened it up a bit…

kjoyner art Mixed Media Art      Mixed Meda Art  

 before and after

This time…I think I will let it sit on the easel for awhile just to make sure I’m done.

Now… onto journaling

Art Journal

Here’s a journal I made… an art and writing journal…

Mixed Media Art Journal

it was so much fun to create my own.

Inside Cover Art Journal 

Inside Cover Art Journal (b)

(I accidentally glued the back inside cover… upside down! Oops!)

As I ventured into learning how to use a sewing machine… I decided to see what it would do with paper… and that is when I began to sew pages together and watch tons of videos on bookbinding… tons out there online… so if you want to try it… just google it… it’s pretty simple… just takes time.

Art Journaling

Can’t wait to start writing and cutting and pasting!!

SO… as Spring approaches…

Royalty Free Image Nest Tea Party

(image: Graphics Fairy)

Hope this inspires you to get out those paint brushes, get out that glue and paper,  get out that needle and thread, get out that hammer and those power tools

and

 Just Create!!


Tuesday, April 12, 2011

Making A Decorative Dress Form


Ok… so this is probably random…but yes… I made a decorative dress form.

Why?

Because I’m crazy like that…

I have one of those minds that tell me…

“you can make that”

My creative ambition is an endless battle… so I just go with it…

And here is how I did it…

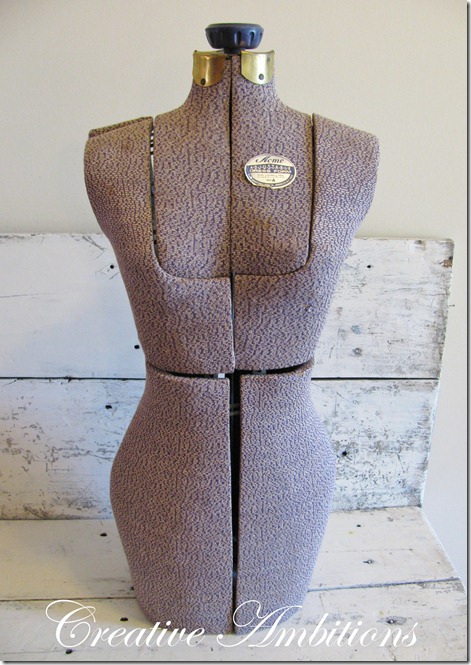
First… I started out with one of these…
017blog

You have to have some sort of mold to try this.

023blog

I wrapped it in saran wrap.

  At this point, you’ll need cardboard, newspaper and glue.

(I used wallpaper glue and at times… elmer’s glue)

I glued lightweight, wet/soaked card board to it at first to give it a sturdy shape.

Then, I glued strips of newspaper all over the cardboard.

It will look something like this…

019blog

(this is the first one I made… it still looks like this)

And the second one I made…

I let it sit for a couple of days to dry.

Next, I took my scissors and cut a straight line up the back.

NOW…

Here is where you need to use your imagination…

I didn’t take pictures of the whole back cutting/seam taping process… sorry!

Bad… I know!  Sad smile

Anywho…

I took the paper shell off the form.

Then, I taped the seam up with some kind of cloth tape we had laying around the house.

After I had her taped back up… I glued some more newspaper over the taped seam.

For the bottom and top of neck… I cut out foam core, doubled it up, and hot glued it in place.

You may even have to hot glue some of the inner cardboard pieces back down.

Now, here was the fun part… I ordered this…

022

It’s a paper-mache/clay mixture.

Sooo…

I mixed it with water and applied it to my paper shell …with my fingers…VERY MESSY.

In fact… you may want a mask(glue and pulp dust flies in the air as you are mixing)

I put it on thick so it had to sit awhile (out in the sun) for a few days to dry.

Next, I sanded… again…VERY MESSY.

I used my hair dyer to blow the dust off of her.

Then, I skimmed it with joint compound to try and smooth out the surface some.
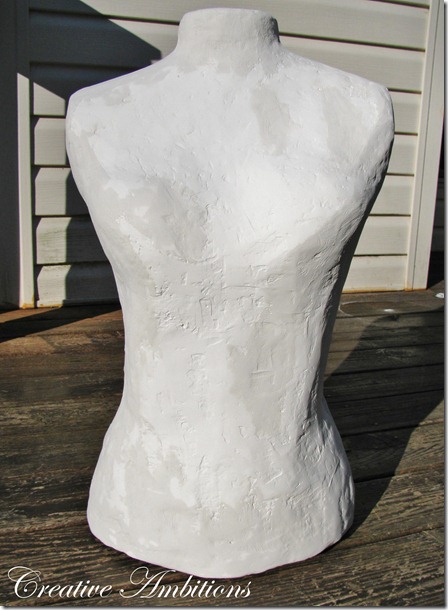
032blog

And… sanded again.   Blew the dust off again.

034blog

And now she was ready to decoupage.

009blog

 Here we go AGAIN with lack of pictures…

I didn’t know if this would even turn out so I didn’t take pics for all the steps.

Finally, I glued pieces of scrapbook paper all over the form.

Eerrrrrrrr…. stop the car… back up…

Ok… so, are you wondering about a base… maybe???

This is still a work in progress… but here is the gist of it…

005

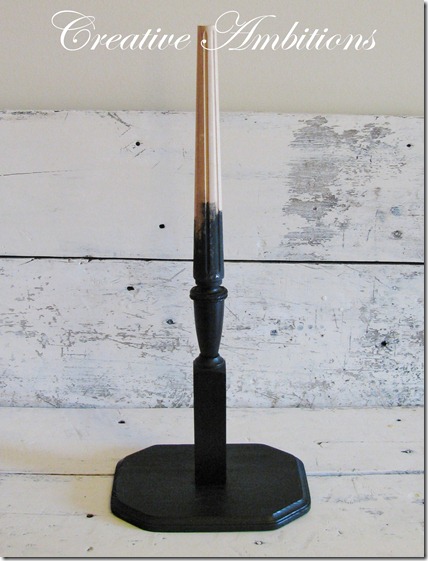
Table leg from my local ReStore.  Wood plaque from Hobby Lobby.
027blog

Drilled a hole for the table leg to fit in, gorilla glued it and painted it black.

Then I cut a hole with my jigsaw in the bottom of the form to slide down the base.

And that’s as far as I’ve gotten with that.  Trying to figure out how to secure it to the base so it’s not wobbly.

Almost there…

024blog

But in the meantime, here she is in her decoupaged glory.

I used a French Toile theme.

I think she looks…very “Boutiquey”.

Soooo…

The modeling paper clay says you can nail in to it?  I don’t know… too scared to try.

Maybe… I will try on the next one before I decoupage it.

014blog

Ok… one more time…

021blog

sporting a ruffled cross body purse I have been working on!

I must say… making her was a messy and lengthy process but if you have the patience…

it can be a fun project.


Thanks For Stoppin’ By!